Before we bought the house, it had been a shared house or a "House of Multiple Occupancy" (HMO) so by law it had to have two toilets. The previous owner had split the bathroom into 2 rooms; one with a basin and toilet and the other with an electric shower, basin and toilet.
 |
| Before |
 |
| The new layout |
I had been furiously pinning inspiration for my dream bathroom on Pinterest for a long time so I already had an idea of how I wanted it to look.
I'd
seen so many bathrooms with patterned floor tiles which would fit in
with the period features of our house. I love this white and grey combo
with the metro tiles in the shower.
 |
| Inspiration |
I originally wanted these tiles from Fired Earth.
They are so beautiful but when we realised that they would cost over
£2,000 for our floor space, we quickly started looking for cheaper
alternatives.
A bit of Googling later and we stumbled upon these beauties from Tons of Tiles! They were perfect and were a fraction of the price of the Fired Earth ones.

We ordered our Simpsons stone resin shower tray and Crosswater shower mixer and rainfall shower head from Sanctuary Bathrooms.
They are a family run company based in Leeds and they were helpful and
friendly. If you need anything for your bathroom, I would definitely
recommend them.
Our freestanding bath came from Bathstore complete with white resin feet. I really wanted We decided to keep one of the existing toilets for now.
I really wanted a wall hung basin and vanity unit to store all our bits and bobs. I had seen this Vero basin from Duravit and it was love at first sight.

I love the minimal Scandinavian style and it has ample space to put hand wash, a candle, a wash bag etc with an option to have a vanity unit underneath. By chance, I spotted an ex-display for sale in our local bathroom showroom in exactly the length we were looking for and with a 2 drawer unit included! We snapped it up immediately. I love it!
After all the planning, we got to work! This involved a LOT of labour. We had to remove a chimney breast brick by brick and lug them all down the stairs and into the garden. (We are keeping them for future use! Watch this space)
 |
| A well-earned cup of tea after removing half the chimney breast. |
We hacked off all the old lime plaster and loaded the rubble into boxes
to take to the tip. This ended up being a horrible job and we thought it
would never end. We didn't want to spend the money on hiring a skip but
in hindsight, this would have saved a lot of time and effort.


 |
| Chimney breast removed! |

We
removed the door stud wall to expose the other toilet and basin and pulled up the old tiles and OSB which was a nightmare to remove! We had to level off the ceiling joists to make the ceiling level before insulating.

We
lived with it like this for quite a while until we had the funds to
carry on. Let's just say there wasn't much privacy! We put up an old duvet cover as a temporary "door" which we named "The Dignity Duvet"!
 |
| The Dignity Duvet! |
 |
| Insulation in the ceiling |
Eventually the time came to remove the electric shower. Our only means of washing. Luckily we have showers at our gym and I have showers at work so we had to make do for 5 weeks! It was awful. I can safely say I will never take hot running water for granted ever again!
 |
| The bathroom minus shower |
 |
| The plastered bathroom |
 |
| The walk-in shower |

Our metro tiles in the shower were installed by the lovely George. These are also from Tons of Tiles.
I'd seen so many images like the one below on Pinterest of showers featuring handy shelves so I insisted on having them in mine. I am not a fan of those chrome shower tidies!

I'd seen so many images like the one below on Pinterest of showers featuring handy shelves so I insisted on having them in mine. I am not a fan of those chrome shower tidies!

 | |||
| Almost finished! Excuse the loo roll! |

 |
| Latex going in |
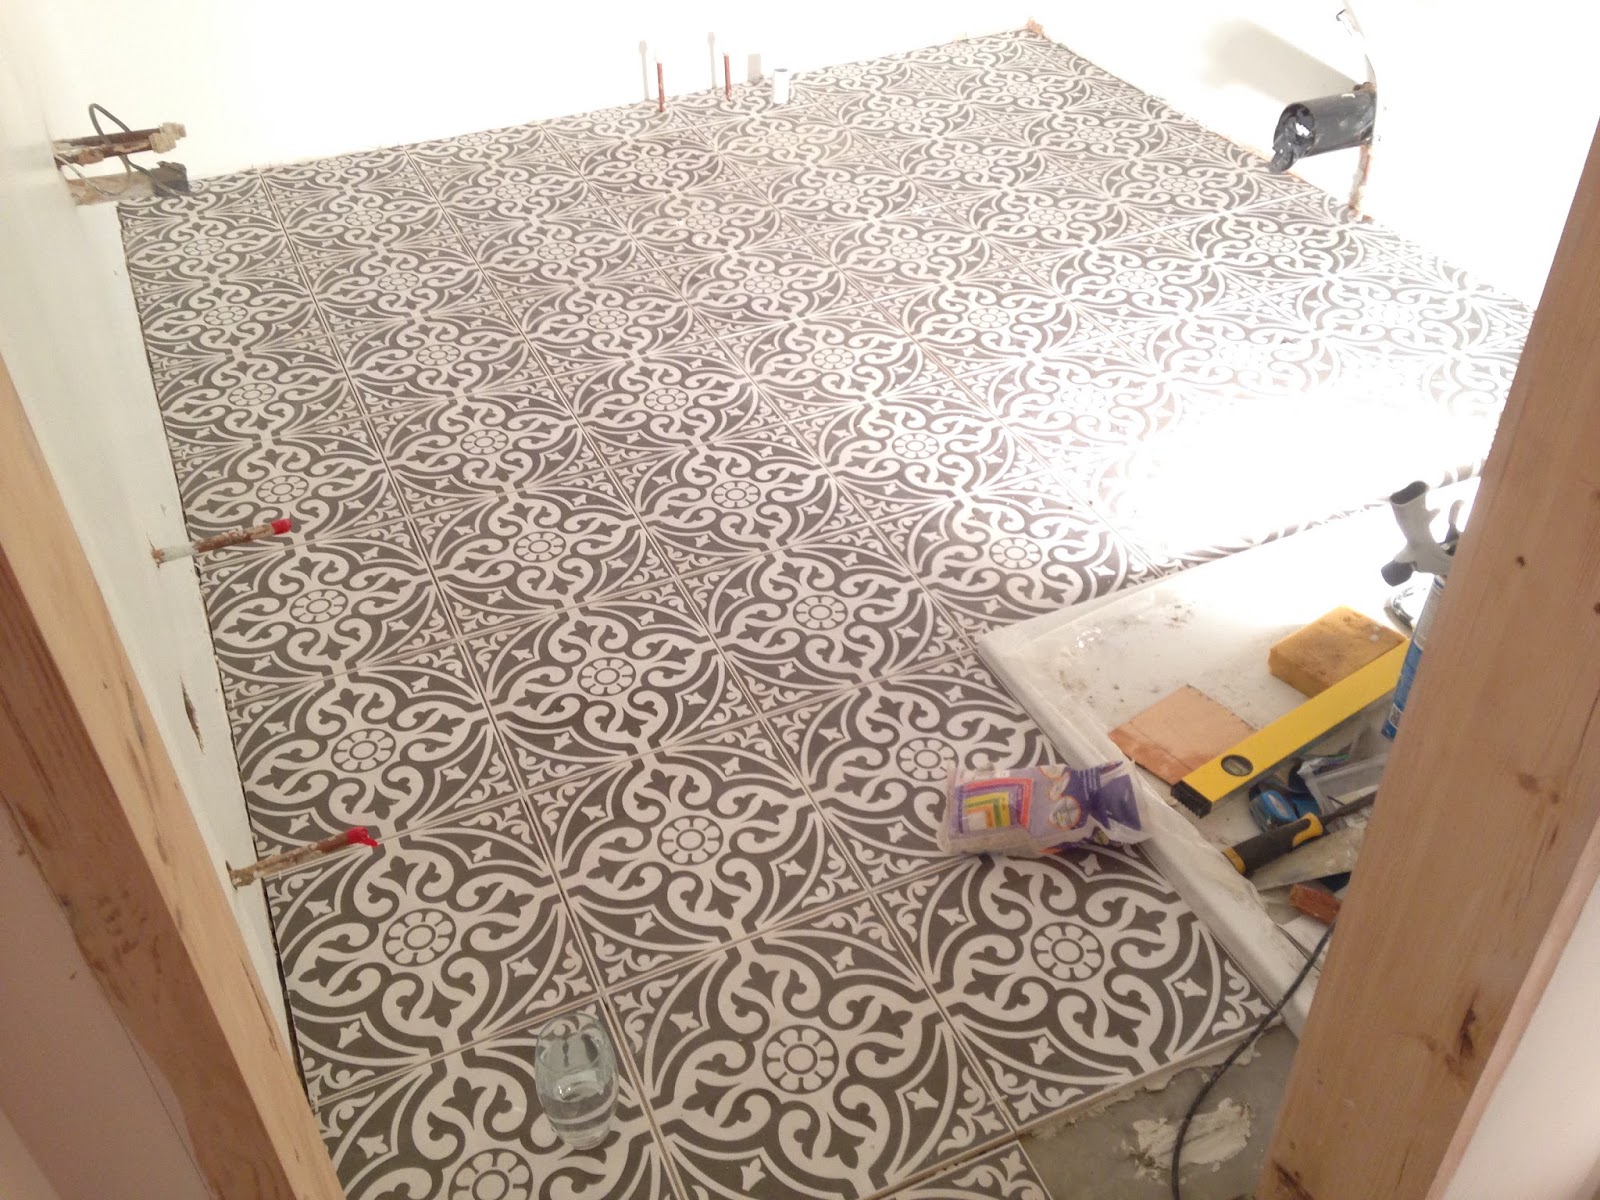 |
| Tiling complete |

 |
| The almost complete bathroom |
Finally, on December 23rd 2015, our bathroom was plumbed in and the boiler switched on! We hadn't had hot running water out of taps since we moved in over a year beforehand. It was the best Christmas present ever! We still have to source a towel rail and a shower screen but it's usable!I will do another post when it's completely finished. We want to add a couple of shelves on the far right hand wall to put some plants and it will also be somewhere to put my iPad while I'm wallowing in the bath! Skirting boards and architraves need to be fitted now and we still have no door or shower screen.
The under floor heating is lovely and we have definitely felt the benefit these last couple of chilly months. We still have no central heating in the rest of the house. 2 winters with no heating! I am not sure how we've managed!
The under floor heating is lovely and we have definitely felt the benefit these last couple of chilly months. We still have no central heating in the rest of the house. 2 winters with no heating! I am not sure how we've managed!


WOW! What a difference they make to the whole appearance of the house!!
ReplyDelete